Ideal Contact – Documentation
Ideal Contact creates contact forms for Joomla and YOOtheme Pro, protected against spam. It follows the way Fox Contact worked, with the same vocabulary, and imports your Fox Contact forms. This guide covers installation, creating a form, the settings and moving from Fox Contact.
Requirements
- Joomla 3.10 (PHP 7.4 or later), 4.4, 5 or 6 (PHP 8.1 or later)
- Any template: the form takes the UIkit (YOOtheme Pro) or Bootstrap style of the site
- YOOtheme Pro 4 or 5 for the page builder element (optional)
- AcyMailing for newsletter sign-up (optional)
Installation
- Download the ZIP from My licences or from the link in the order email. Do not unzip it.
- In Joomla, open System › Install › Extensions and drop the ZIP into Upload Package File.
- The package installs the Ideal Contact component (dashboard and received messages), the Ideal Contact module (the form) and the System - Ideal Contact (YOOtheme Pro) plugin, enabled automatically. Without YOOtheme Pro this plugin does nothing.
A new version is installed the same way, over the previous one. Your forms and messages are kept; Joomla then shows what is new in the version.
Uninstall
In System › Manage › Extensions, tick only the package line “Ideal Contact”, then Uninstall. Received enquiries stay in the database: a reinstall finds them again. Joomla deletes the Ideal Contact modules. If you came from Fox Contact and it is still installed, switched forms automatically go back to Fox Contact; after a reinstall, they can be imported again.
Licence key and updates
Your licence key (format IDPC-XXXX-XXXX-XXXX-XXXX) is in your order e-mail and on the My licences page. Paste it once per site:
- Open System › Update › Update Sites.
- Click Ideal Contact. Joomla shows “missing download key”.
- Paste the key into the Download Key field, then click Save & Close.
New versions then appear in System › Update › Extensions and install in one click. Updates and e-mail support are included for 12 months. After that, the extension keeps working with no time limit; only access to new versions stops. You can renew at any time from My licences.
The package installs the component (Components › Ideal Contact), the Joomla module and the YOOtheme Pro element.
On Joomla 3.10, the same field is in Extensions › Manage › Update Sites.
Create a form
As in Fox Contact, one form = one module or one page (menu item). All settings are made in the module or in the menu item.
- Form in a template position (sidebar, footer…): Components › Ideal Contact › Create a contact module, choose the position and the pages, then set the tabs below.
- Contact page: Components › Ideal Contact › Create a contact page (menu item type "Ideal Contact › Form").
- In a YOOtheme Pro page: first create the form in a published Ideal Contact module (it needs no position), then add the Ideal Contact element (IdealPC group) in the page builder and choose the form in the list. The settings stay in the module; enquiries arrive as usual.
Every form has the same tabs:
| Tab | Purpose |
|---|---|
| Form fields | The visual designer: rows, columns and fields of the form. |
| Actions | What happens after sending: email to the administrators, copy to the user, message or redirection, saving in the database. |
| Security | Anti-spam, anti-robot protection and captcha. |
Multilingual site
Create one Ideal Contact module per language (the module’s Language setting) in the same position, for example contact. In the page builder, the Ideal Contact element then automatically shows the form in the page language. On a multilingual site, the element also offers one choice per language (“Form – English”…) to force a specific form. For a contact page, the associated menu item (Joomla associations) is used.
"Form fields" tab (the designer)
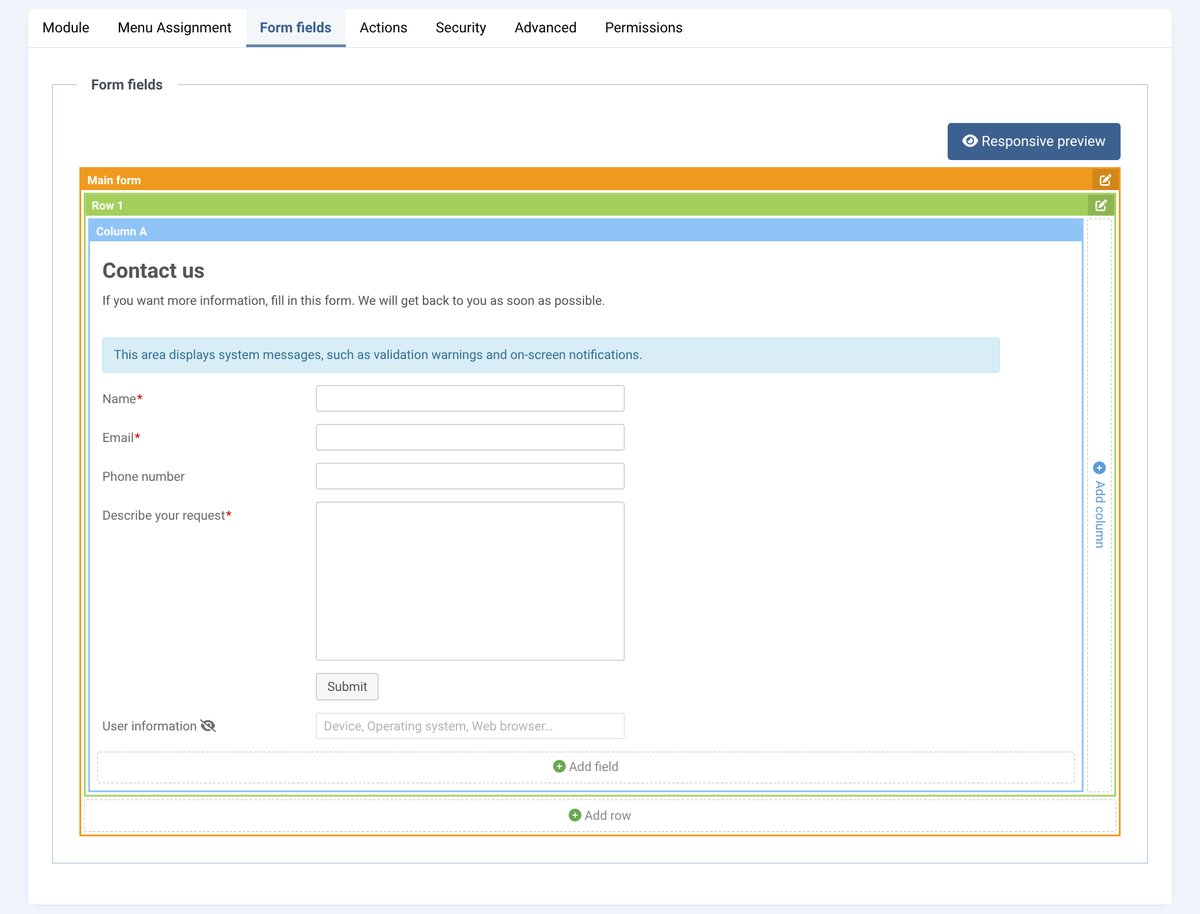
- The orange "Main form" bar sets the general layout (labels beside or inside the fields, widths, UIkit / Bootstrap style).
- The green bars are the rows, the blue bars the columns. "Add column" on the right, "Add row" at the bottom.
- Add field opens the "Field types" palette. Greyed-out types are already in the form (some can only be added once: Name, Email address, Captcha, reCAPTCHA, Attachments, Unique identifier, Newsletter integration, Submit…).
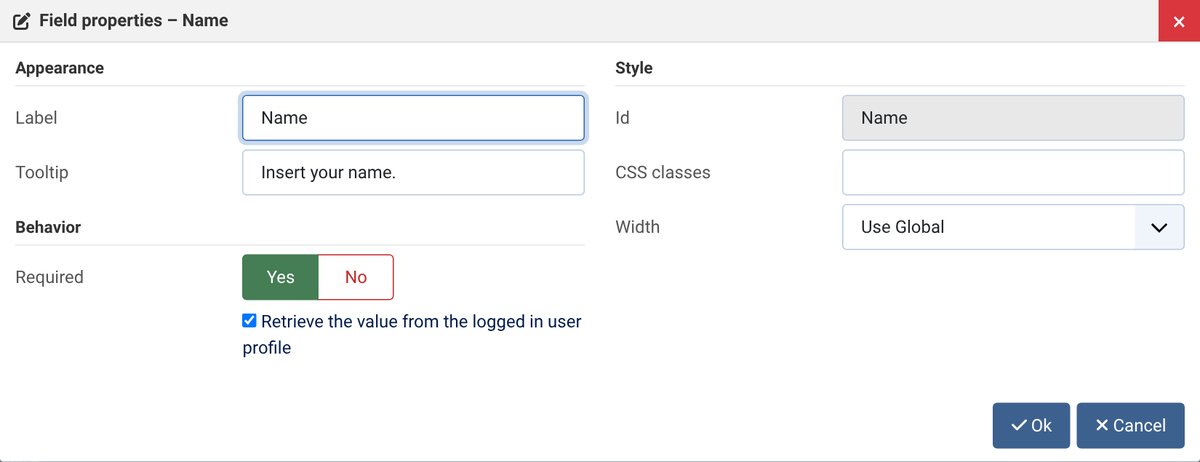
- Click a field to open its properties (Appearance, Behavior, Style). Move a field by drag and drop.
- Don’t forget Save at the top of the page: the designer changes are saved with the module.
Preview and test the form
Two buttons, both using the settings not yet saved:
- Preview (toolbar at the top, next to Save, as in RSForm! Pro): opens the form on your site, in a new tab, with the whole template (header, menu, footer). The form really works: captcha, reCAPTCHA, emails, message or redirection after sending. Test messages are not added to Submitted items.
- Responsive preview (top right of the designer): the form in a window, at Desktop, Tablet or Mobile width, to check the layout. Fields are checked as on the site, but nothing is sent; reCAPTCHA / Turnstile / hCaptcha are replaced by a placeholder.
Both stay valid for 30 minutes. After a change, click the button again. A preview does not replace saving: click Save afterwards.
Special fields
Phone. A "Single line text" field whose label mentions a phone (Phone, Telephone, Mobile, Téléphone, Natel…) automatically becomes a phone field; you can also choose it in its properties, Content setting (Automatic / Free text / Phone number). Letters are refused and the number is formatted: 0794448834, 079/444.88.34 or (079) 444 88 34 → 079 444 88 34; +41794448834, 0041 79… or +41 (0)79… → +41 79 444 88 34. Foreign numbers are accepted as typed (6 to 15 digits).
Attachments. The visitor clicks Add files (a button in the template’s style) or drops files into the area; files can be added in several steps and removed (×) before sending. Settings: minimum and maximum number of files, maximum size per file (limited by the server, shown in the window), accepted types (images, documents, archives, audio, video), maximum size attached to the email (above it, the files remain downloadable in Submitted items), deletion of the files after sending. Dangerous files (programs, scripts, web pages, fake image files) are always refused. Files are kept in a protected folder, under a secret name, and deleted together with the message.
Unique identifier. Gives each message a number (e.g. 125-QUOTE): digits, letters or both, with an optional series. It does not appear in the form; use the variable shown in its properties (e.g. {uniqueidentifier}) in the email subject or body, and in the message shown after sending ("Your request number: {uniqueidentifier}").
Newsletter integration (AcyMailing). Subscribes the visitor to AcyMailing lists (as in Fox Contact), with the address of the Email field. Settings: lists (only active lists are offered), display (one checkbox for all lists, one checkbox per list, or no checkbox = automatic subscription, not recommended), label position, preselected checkbox, email confirmation (double opt-in, enabled by default). A subscriber who already exists is not created again. If AcyMailing is not installed or is disabled, the field is simply not shown. To comply with the GDPR and the Swiss FADP: checkbox unticked by default and email confirmation enabled.
"Actions" tab
- Administrators: receiving address(es) (empty = site address), copy, blind copy, email subject and body. Variables:
{sitename},{field-table-full},{field-table},{date},{time},{current-url},{page-title},{client-ip-address}… - User: copy sent to the sender.
- On screen: message shown after sending, or redirection to a page.
- Database: save the messages (Components › Ideal Contact › Submitted items).
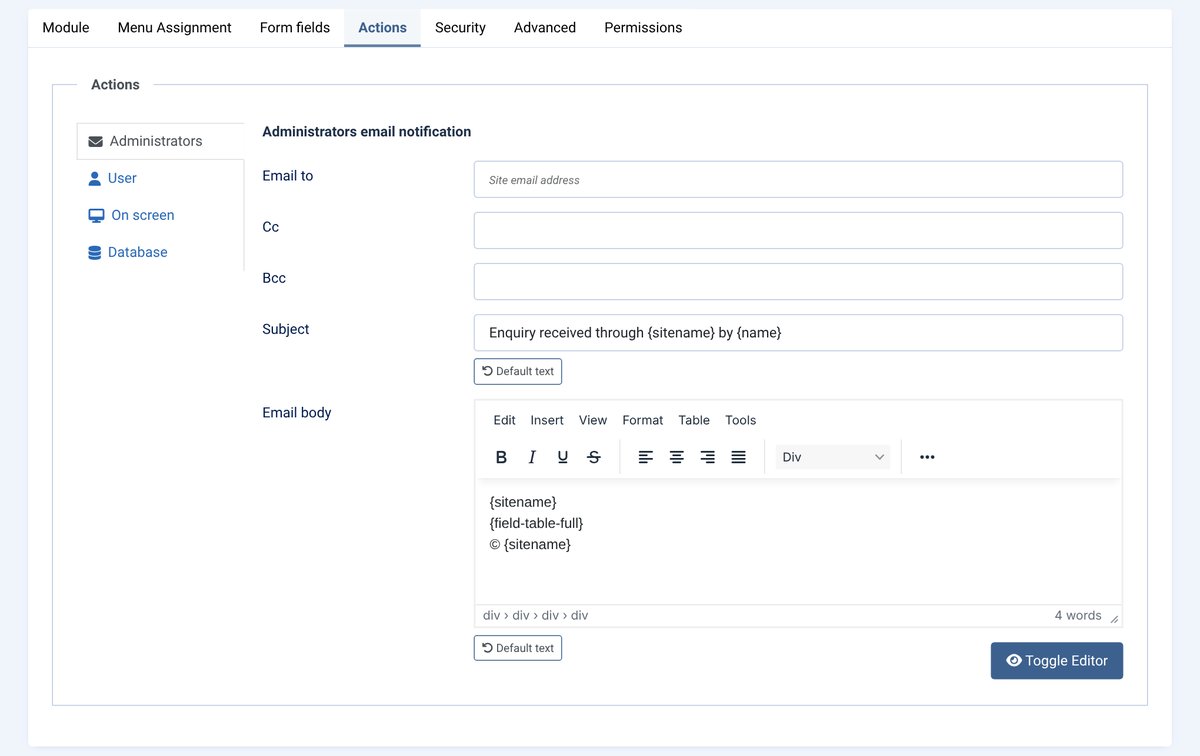
Default texts. Subjects, emails and the on-screen message are prefilled in the form language (language of the module or menu item; for "All", the language of your administrator interface). The Default text button under each field restores the suggested text if you changed it. On a multilingual site, create one module per language if the emails must be translated.
Messages and emails are sent in the language of the page where the visitor filled in the form.
Tip: in a "Dropdown" field, each choice can have an additional email address (e.g. "Quote" → quotes@…).
Email appearance
Appearance pane: Logo, shown at the top of both emails instead of the site name (PNG or JPG: SVG is not displayed in Outlook or Gmail), Logo width in pixels, and Accent colour (line at the top, “Reply” button, links). The {logo} variable adds the logo elsewhere, for example in the footer.
Variables
Under each email, the list of variables: {sitename}, {logo}, {date}, {time}, {user}, {current-url}, {page-title}, {client-ip-address}, {field-table-full} (all fields and technical information), {field-table} (all fields), then the form fields (e.g. {name}, {email}, {textarea1}). Click a variable to copy it, then paste it into the text.
If the confirmation email contains neither {field-table} nor {field-table-full}, a summary of the enquiry is added automatically at the bottom.
"Security" tab and captcha
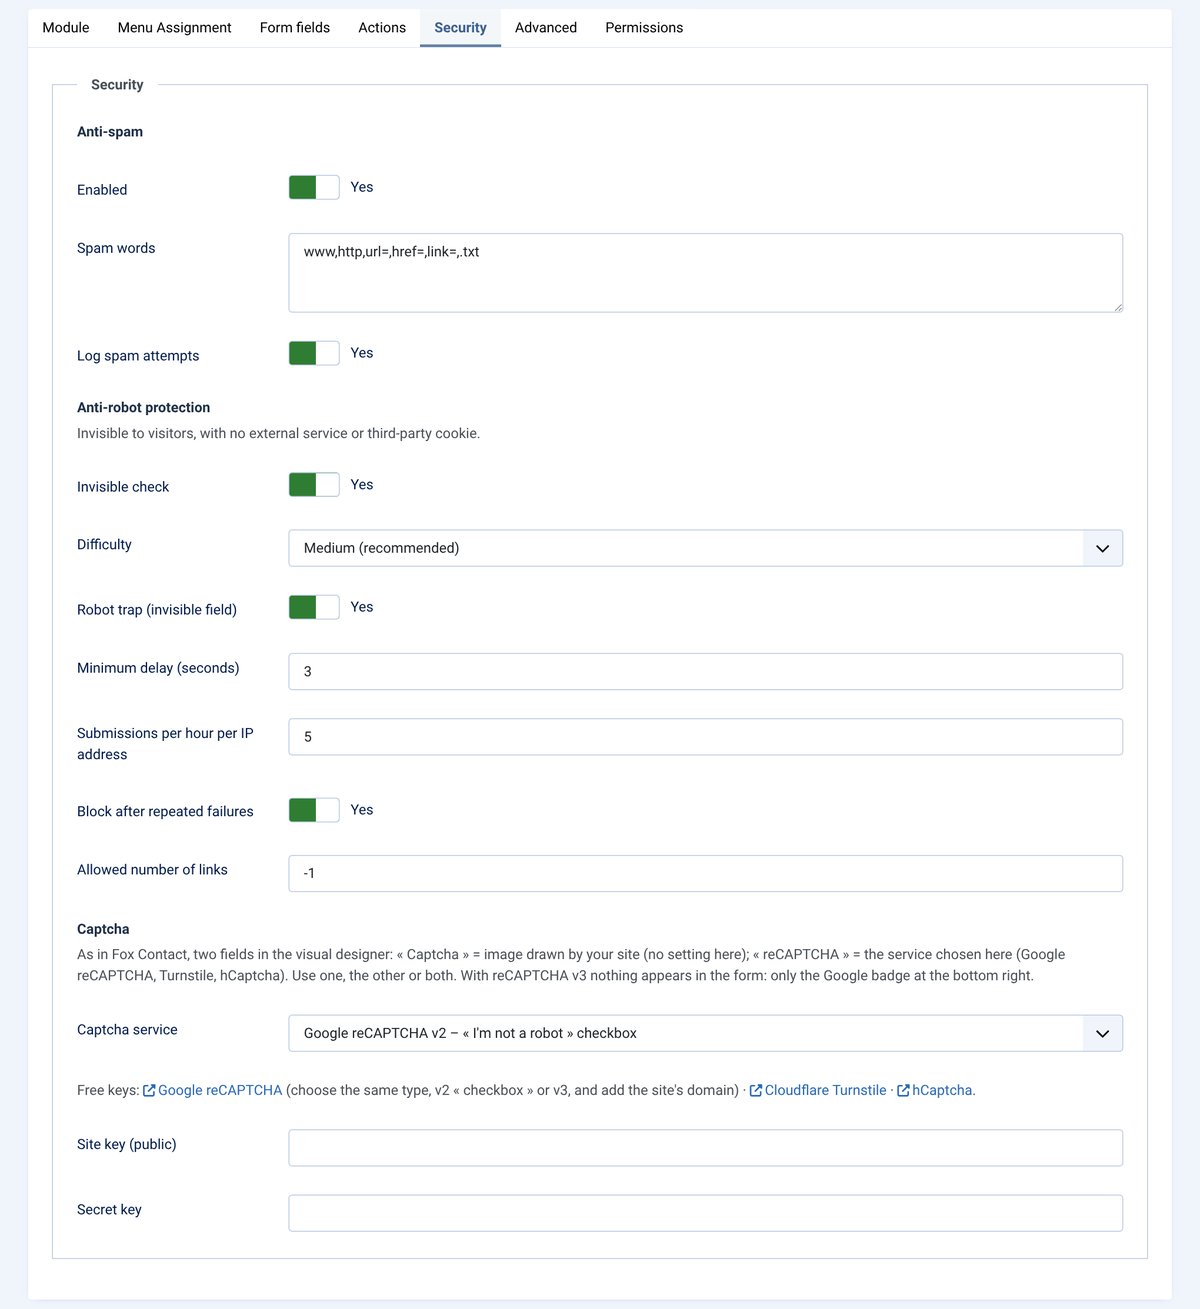
Ideal Contact protects every form with several layers. The first four are active by default and invisible to your visitors; the captcha comes on top, if you want one.
| Protection | Visible? | Setting |
|---|---|---|
| Spam words (Fox Contact anti-spam) | no | Security › Anti-spam |
| Invisible check (the browser solves a small calculation) | no | Security › Anti-robot protection |
| Robot trap, minimum delay, submissions per hour per IP address, blocking after repeated failures | no | Security › Anti-robot protection |
| Limited copies to visitors: 20 per hour per form (setting) and 3 per hour per email address, so the form cannot be used to send bulk email | no | Security › Anti-robot protection |
| Captcha (image) and/or reCAPTCHA | yes (except reCAPTCHA v3) | designer fields; keys in Security › Captcha |
5.1 Add a captcha – two fields, as in Fox Contact
In the "Form fields" tab, the "Field types" palette offers two captchas. You can use one, the other, or both:
| Field | What it shows | Setting |
|---|---|---|
| Captcha | an image drawn by your site: letters and digits, or a sum (e.g. 7 + 3) | in its properties (click the field): type, number of characters, size, colours. No key. |
| reCAPTCHA | the service chosen in the Security tab: Google reCAPTCHA v2 or v3, Cloudflare Turnstile, hCaptcha | "Security" tab › Captcha: service + site key + secret key |
For Google reCAPTCHA: 1. Form fields tab › Add field › reCAPTCHA. 2. Security tab › Captcha: choose the service, paste both keys. 3. Save.
⚠ Keys alone are not enough: without a reCAPTCHA field in the form, Google is not shown. And the Captcha (image) field never uses the keys.
ℹ A reCAPTCHA field without keys shows an image instead: a form with a captcha is never left unprotected.
Two captchas add a little protection but also bother your visitors; with Ideal Contact’s invisible protections, one captcha is enough in most cases (reCAPTCHA v2 or Turnstile recommended).
5.2 Which service?
| Service | What the visitor sees | Keys |
|---|---|---|
| Google reCAPTCHA v2 | the "I’m not a robot" checkbox (as in Fox Contact) | type "v2 – checkbox" |
| Google reCAPTCHA v3 | nothing in the form – only a small Google badge at the bottom right of the page | type "v3" |
| Cloudflare Turnstile | a small box, often validated automatically | free, no advertising tracking |
| hCaptcha | a checkbox, sometimes images to pick | free |
| Image (letters or sum) | an image to copy | no key, no external service |
Google keys belong to one type: v3 keys do not work in v2 (and vice versa). At Google, choose the same type as in Ideal Contact.
5.3 Get Google reCAPTCHA keys
- Open https://www.google.com/recaptcha/admin (link also in the Security tab) and sign in with a Google account.
- Create a site: a name, the type (v2 "I’m not a robot" checkbox, or v3), and the site’s domain (e.g.
example.com, withouthttps://). - Google shows a site key and a secret key: paste them in Security › Captcha.
For reCAPTCHA v3, the minimum score (0.5 recommended) sets the strictness: Google rates each visitor from 0 (robot) to 1 (human).
5.4 I can’t see the captcha
- For Google / Turnstile / hCaptcha: is the reCAPTCHA field in the form (Form fields tab)? The Captcha field always shows an image, never Google.
- Are both keys filled in, without spaces, and is the domain declared at Google?
- Did you choose reCAPTCHA v3? Then it’s normal: nothing appears in the form, only the Google badge at the bottom right.
- Was the module saved? Also clear the Joomla cache if page caching is enabled.
- The service’s script only loads when the form becomes visible on screen: scroll down to the form.
Blocked submissions (wrong captcha, robot, limit reached, service unreachable) are written to administrator/logs/idealcontact.php when "Log spam attempts" is enabled.
Received messages
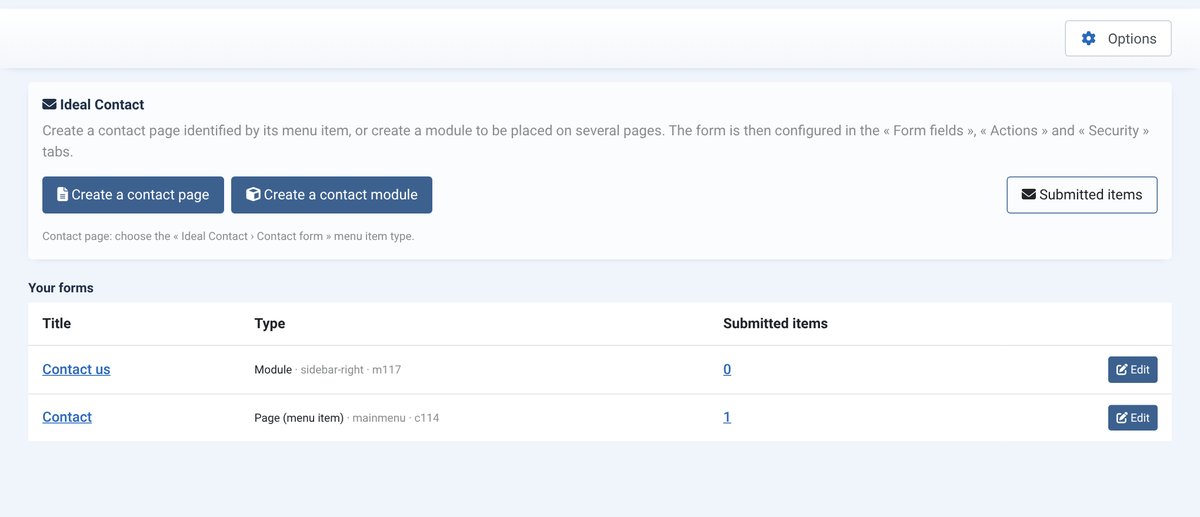
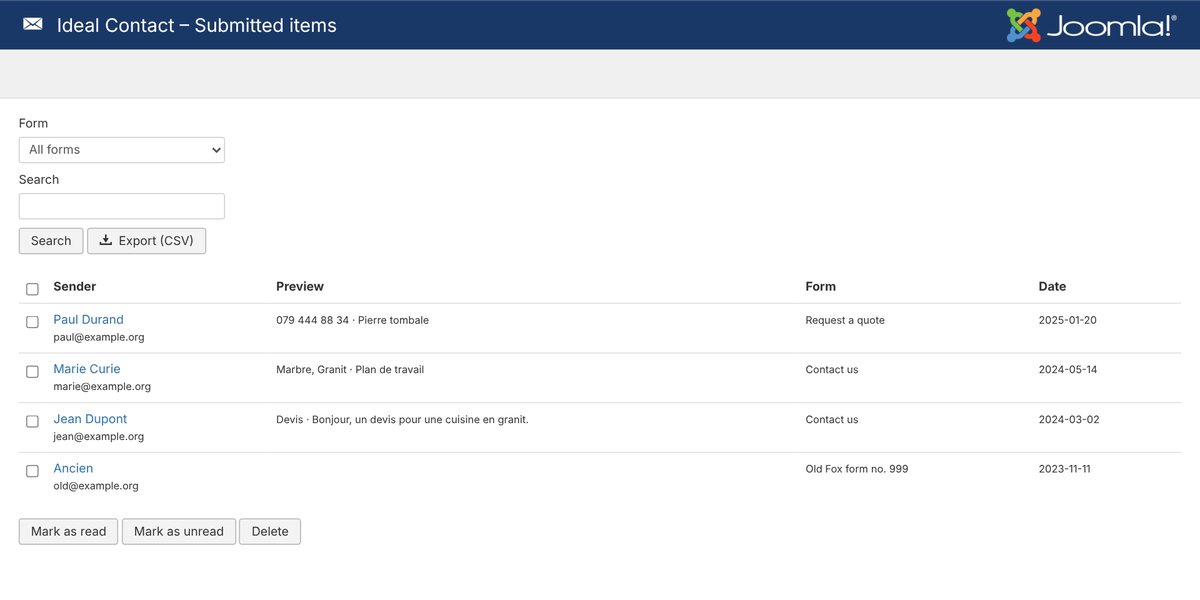
Components › Ideal Contact: - Dashboard: the list of your forms (module or page), with the number of messages and unread messages. - Submitted items: all messages, filter by form, read / unread, deletion, CSV export (Excel).
Coming from Fox Contact
- Tab, field type and setting names are those of Fox Contact.
- Both Fox Contact fields still exist: Captcha (image) and reCAPTCHA, usable together.
- Fox Contact’s reCAPTCHA used Joomla 3’s reCAPTCHA plugin, which no longer exists in Joomla 5 and 6: in Ideal Contact, the keys are entered directly in the Security tab. When importing, the keys of that plugin are taken over automatically.
7.1 Replace Fox Contact, then migrate the site
Fox Contact does not run on Joomla 4 and later: it blocks the pre-update check. Ideal Contact also installs on Joomla 3.10 (PHP 7.4 or later): you replace Fox Contact on the current site, then migrate whenever you like, without redoing anything.
- Back up the site (files and database).
- Install Ideal Contact on the Joomla 3 site.
- Open Components › Ideal Contact: the dashboard reports the Fox Contact forms it found. Click Import.
- Import the selected forms: each Fox module becomes an unpublished Ideal Contact module, in the same position and on the same pages, with the same fields, texts, emails and settings. Fox menu items are prepared.
- For each form: Preview to try it on the site (nothing is published), Edit if needed, then Switch. The Ideal Contact module is published and the Fox module unpublished; a menu item keeps the same address (same Itemid), so links and search rankings do not change.
- As long as Fox Contact is installed, Restore Fox Contact undoes the switch.
- Import the enquiries: the messages received by Fox Contact join the Submitted items, linked to the right form. The request number counter continues after Fox’s. The import can be run again: it only adds new enquiries.
- When all forms are switched, the page offers to uninstall Fox Contact (component, module, plugin and library). Joomla’s pre-update check then shows Ideal Contact as compatible.
- Migrate the site to Joomla 4.4, then 5 or 6: Ideal Contact keeps working without reinstalling. Switch PHP to 8.1 or later before Joomla 5.
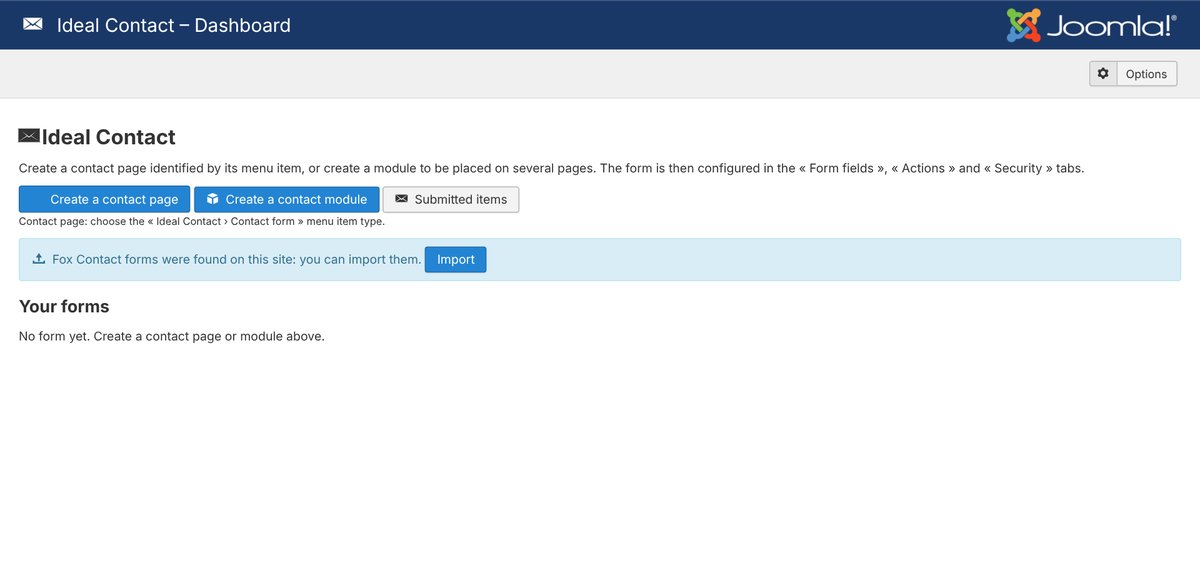
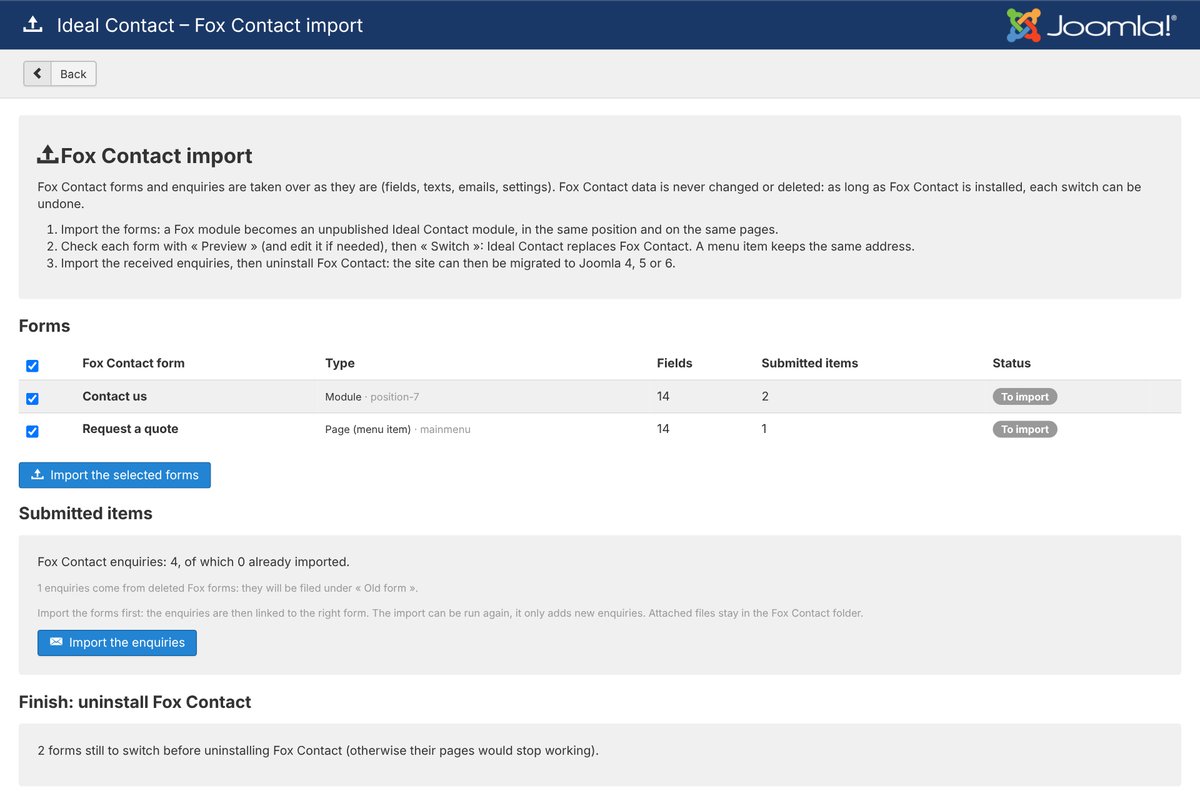
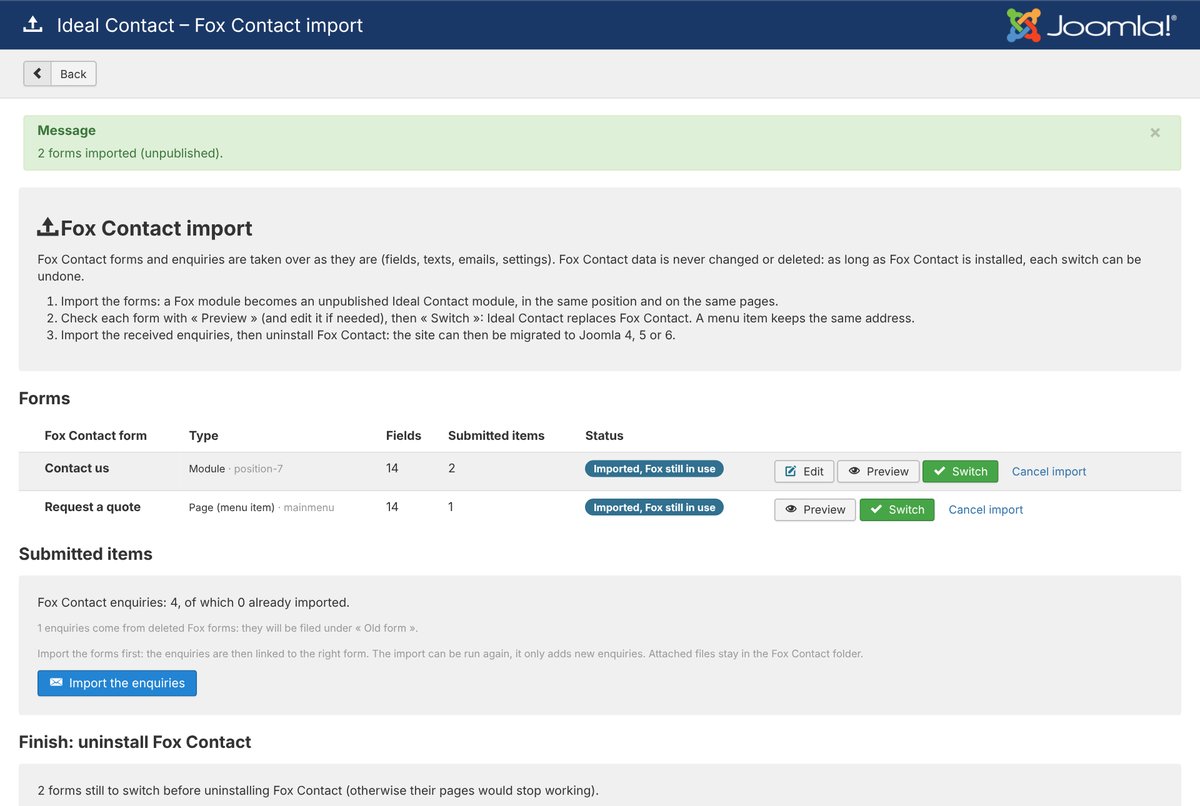
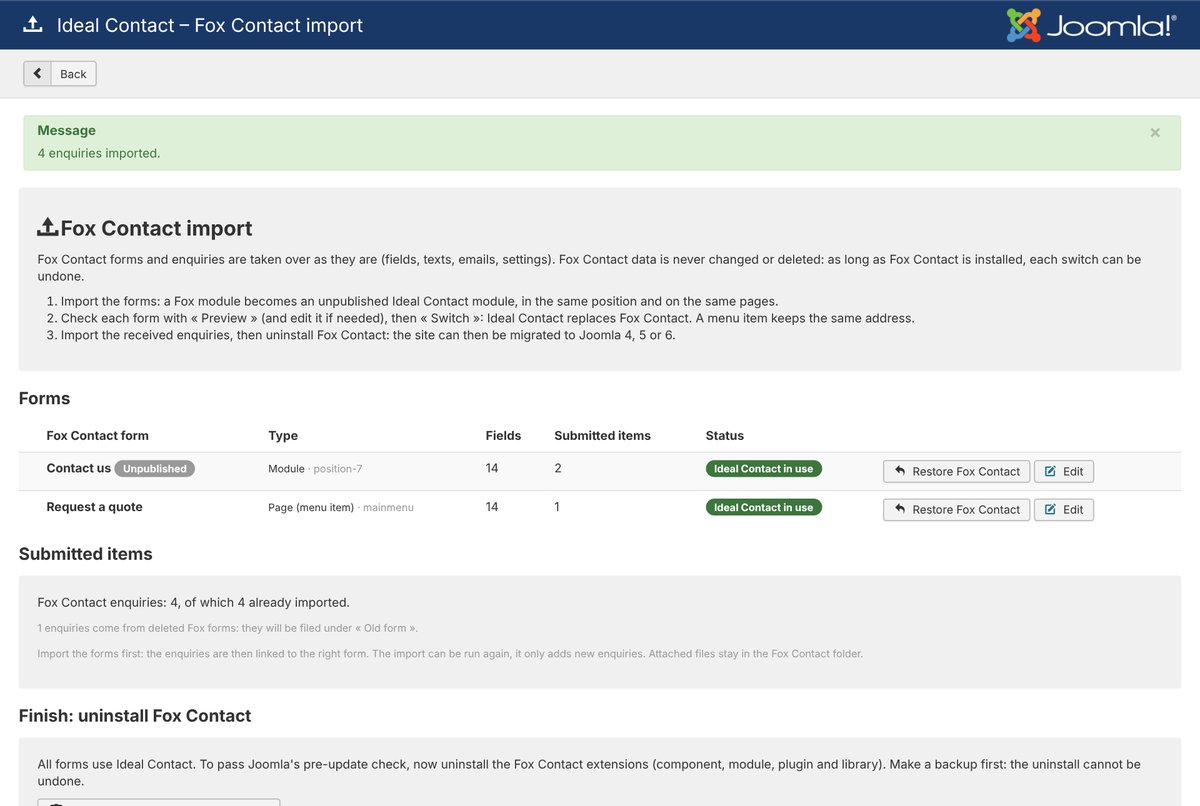
The import never changes or deletes Fox Contact data. Not taken over: the Joomla private message sent to a user (a rare Fox setting); attached files of old enquiries stay in the Fox Contact folder. If a site language is not translated in Ideal Contact (fr, de, en, it, es, nl, pt), the interface is shown in English; the texts of your forms stay in their language.
On a site already migrated to Joomla 4 or 5 where the Fox Contact data stayed in the database, the same import works.
Fox Contact versions. The import is designed for Fox Contact 3.x and tested with 3.9.8, the last version for Joomla 3.
Replacing RSForm! Pro or another form extension
There is no automatic import from RSForm! Pro, ChronoForms or Convert Forms, but switching is quick:
- Create an Ideal Contact module with the same fields, the same recipient addresses and the same email texts.
- reCAPTCHA: copy the site key and the secret key from the old extension’s configuration, paste them into Security › Captcha (same type: v2 or v3), then add the reCAPTCHA field to the form.
- Place the form in the same spot: same position, same page, or the Ideal Contact element in YOOtheme Pro.
- Send a test, then disable the old extension without uninstalling it straight away, so you can go back.
The contact form of idealpc.ch was replaced this way: RSForm! Pro → Ideal Contact, in French and English, with reCAPTCHA v3.
Support
A question, a bug, an idea? Write to